
VMware Networking: A Comprehensive Guide to Virtual Network Configuration (Part 1)
Introduction
When working with virtual machines in VMware Workstation, choosing the right network configuration is crucial for both functionality and security. In this comprehensive guide, we'll explore NAT (Network Address Translation) networking - one of the most practical and widely-used network modes in VMware Workstation.
This is part of our VMware networking series where we cover different network types. In this article, you'll learn:
- What NAT is and why it's important
- How to configure NAT networking in VMware Workstation
- What port forwarding is and why you need it
- Step-by-step port forwarding configuration
- Real-world example: Accessing Docker containers running inside VMs
Whether you're setting up a home lab, testing network configurations, or running development environments, this guide will help you master NAT networking in VMware.
What is NAT (Network Address Translation)?
NAT (Network Address Translation) is a networking technique that translates private IP addresses to public IP addresses as network traffic passes through a router or gateway device.
Think of NAT as a translator between two different networks. It allows devices on a private network (with private IP addresses) to communicate with devices on a public network (like the internet) using a shared public IP address.
How NAT Works: Simple Analogy
Imagine an apartment building with one main address:
- The building has one public address (123 Main Street)
- Each apartment inside has a private number (Apt 101, 102, 103...)
- When apartment 102 sends mail, it goes out with the building's address
- Return mail comes to the building, and the receptionist (NAT device) knows to deliver it to apartment 102
In networking terms:
- Building address = Your host computer's IP (from your router)
- Apartment numbers = Your VMs' private IPs
- Receptionist = VMware's NAT device
Why is NAT Used in Networking?
NAT serves several critical purposes in modern networking:
1. IP Address Conservation
IPv4 addresses are limited - there are only about 4.3 billion possible addresses. With billions of devices worldwide, we would have run out long ago without NAT.
Example:
- Your home router gets one public IP from your ISP (like 203.45.67.89)
- But you have 10+ devices at home (phones, laptops, smart TVs, IoT devices)
- NAT allows all devices to share that single public IP
2. Security and Privacy
NAT provides an additional layer of security:
- Hides internal network topology from the outside world
- Blocks unsolicited inbound traffic by default
- Internal devices are not directly accessible from the internet
- Acts as a basic firewall
3. Network Flexibility
NAT makes network management easier:
- Change ISPs without renumbering your entire internal network
- Merge networks with overlapping IP address schemes
- Simplified administration - you control the internal IP scheme
Why Use NAT in VMware Workstation?
In VMware Workstation, NAT networking is the most practical choice for most scenarios. Here's why:
1. Immediate Internet Access
- VMs get internet connectivity out of the box
- No network configuration required
- VMware's built-in DHCP server assigns IPs automatically
- Works immediately after VM creation
2. Network Isolation with Connectivity
- VMs are isolated from your physical LAN (other computers can't directly reach them)
- Yet VMs still have full internet access through your host machine
- Perfect for testing and lab environments where you need separation
- Safe to run potentially risky configurations without affecting your network
3. Works Everywhere
NAT is universally compatible:
- ✅ Corporate networks with strict policies
- ✅ Hotel WiFi
- ✅ Coffee shop networks
- ✅ Home networks
- ✅ VPN connections
- ✅ Cellular tethering
You don't need additional IP addresses or permission from network administrators.
4. Host-VM Communication
- Host and VMs can communicate directly
- Host gets a virtual adapter in the same subnet
- Perfect for SSH, file transfers, or accessing VM services
- Bi-directional connectivity
5. Ideal for Lab Environments
For network engineers, developers, and IT professionals:
- Won't interfere with production networks
- Can run multiple isolated NAT networks simultaneously
- VMs on the same NAT network can communicate with each other
- Perfect for SD-WAN labs, security testing, development environments
How NAT Works in VMware Workstation
When you configure a VM to use NAT mode, VMware creates a virtual networking infrastructure:
Behind the Scenes:
- Virtual NAT Device - VMware creates a virtual NAT router (typically VMnet8)
- Virtual DHCP Server - Automatically assigns IP addresses to VMs
- Virtual Network Adapter - Host gets an adapter to communicate with VMs
- Translation Table - Maps internal VM traffic to host's network
Traffic Flow Example:
Ubuntu VM (192.168.10.4)
    ↓
NAT Device (192.168.10.2)
    ↓
Host PC's Physical Adapter (192.168.1.154)
    ↓
Router (192.168.1.1)
    ↓
Internet
What happens:
- Your VM sends a request with source IP
192.168.10.4 - The NAT device translates it to
192.168.1.154(your host's IP) - The internet sees traffic coming from
192.168.1.154, not from the VM - Return traffic is mapped back to the correct VM automatically
Configuring NAT Network in VMware Workstation
Let's set up NAT networking step by step using VMware's GUI.
Step 1: Open Virtual Network Editor
- Open VMware Workstation
- Go to Edit menu → Virtual Network Editor
[Screenshot placeholder: VMware Edit menu with Virtual Network Editor highlighted]
Step 2: Get Administrator Privileges
When the Virtual Network Editor opens, most options will be grayed out.
- Click the "Change Settings" button (bottom-right corner)
- Click "Yes" when Windows UAC prompt appears
- All options now become active and editable

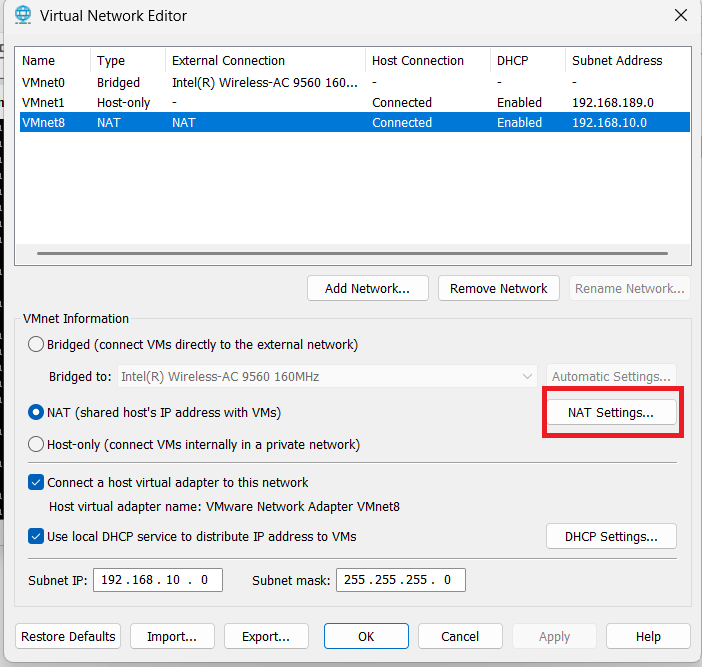
Step 3: Select NAT Network
In the Virtual Network Editor:
- Look at the list of virtual networks
- Click on VMnet8 (the default NAT network)
- Verify the Type column shows NAT
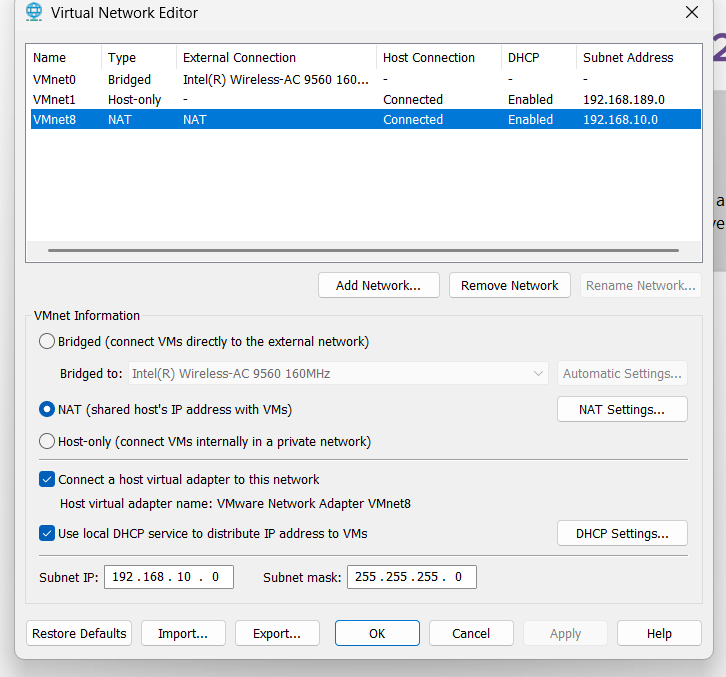
Step 4: Configure NAT Subnet
With VMnet8 selected, you can customize the subnet:
In my example:
- Subnet IP: 192.168.10.0
- Subnet Mask: 255.255.255.0 (this gives us 192.168.10.0/24)
This means all VMs on this NAT network will get IPs in the range 192.168.10.1 - 192.168.10.254.
Default Settings:
- VMware usually uses 192.168.138.0/24 by default
- You can change this to any private IP range you prefer
- Common choices: 192.168.10.0/24, 10.0.0.0/24, 172.16.0.0/24
Step 5: Verify DHCP Settings
- Click the "DHCP Settings" button
- Verify the DHCP IP range:
- Starting IP address: Usually .128 (e.g., 192.168.10.128)
- Ending IP address: Usually .254 (e.g., 192.168.10.254)
- Click "OK"
Step 6: Apply Settings
- Click "Apply" or "OK" in the Virtual Network Editor
- Settings are saved and applied immediately
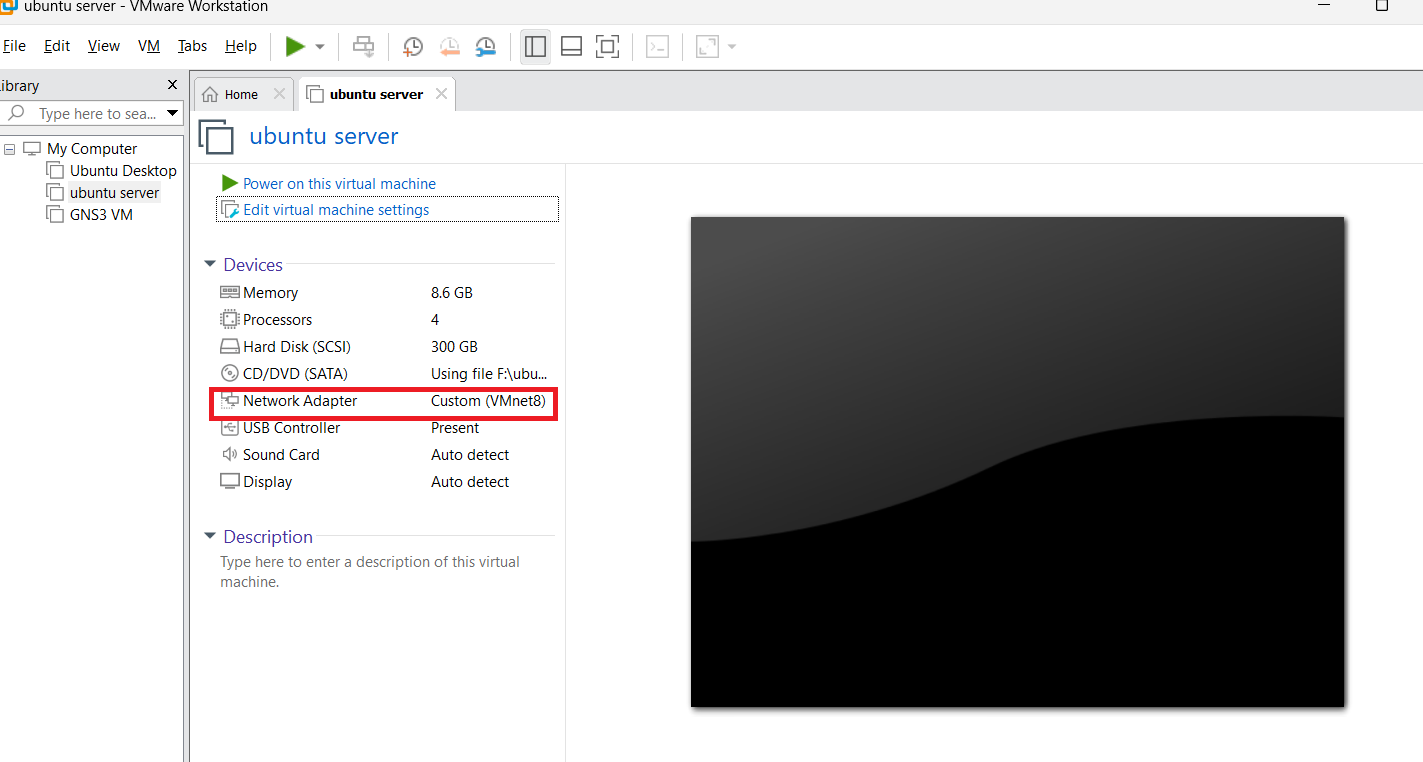
Step 7: Configure VM to Use NAT
Now configure your virtual machine:
- Select your VM in VMware Workstation
- Go to VM → Settings
- Click on Network Adapter
- Select NAT: Used to share the host's IP address
- Click "OK"
Step 8: Verify VM Network Connection
Start your VM and verify the network configuration.
For Ubuntu/Linux VM:
bash
ip addr show
# Or
ifconfig
You should see an IP address in your NAT subnet range.
In my example:
- My Ubuntu Server VM received: 192.168.10.4
- This IP was assigned by VMware's DHCP server
- The VM is now connected to the internet through NAT

For Windows VM:
In cmd
ipconfig
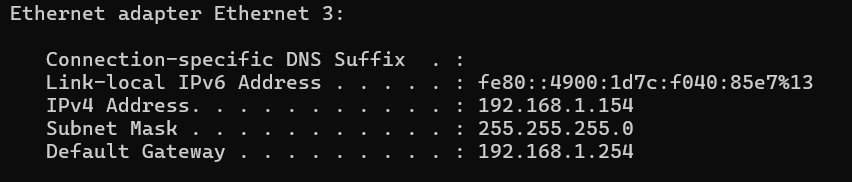 ### **Understanding the Network Setup**
At this point, here's what we have:
- **Router IP:** 192.168.1.1 (your home/office router)
- **Host PC IP:** 192.168.1.154 (assigned by router via DHCP)
- **NAT Subnet:** 192.168.10.0/24 (VMnet8)
- **NAT Gateway:** 192.168.10.2 (VMware's virtual NAT device)
- **Ubuntu VM IP:** 192.168.10.4 (assigned by VMware DHCP)
**Traffic Translation:**
- When the Ubuntu VM (192.168.10.4) accesses the internet
- It goes through the NAT gateway (192.168.10.2)
- Gets translated to the host's IP (192.168.1.154)
- Then goes through your router (192.168.1.1) to the internet
The internet sees all VM traffic as coming from **192.168.1.154** (your host PC).
---
## **What is Port Forwarding?**
Now we have a problem. The VM has internet access, which is great. But what if you're running a **service inside the VM** (like a web server, SSH, database, or Docker container) that you want to access from your host machine or network?
**The Problem:**
Your Ubuntu VM is running a Docker container on port 8004. But the VM has a private IP (192.168.10.4) that's only accessible within the NAT network. You **cannot** access it directly from your host machine using `http://192.168.10.4:8004` in your browser.
### **Understanding the Network Setup**
At this point, here's what we have:
- **Router IP:** 192.168.1.1 (your home/office router)
- **Host PC IP:** 192.168.1.154 (assigned by router via DHCP)
- **NAT Subnet:** 192.168.10.0/24 (VMnet8)
- **NAT Gateway:** 192.168.10.2 (VMware's virtual NAT device)
- **Ubuntu VM IP:** 192.168.10.4 (assigned by VMware DHCP)
**Traffic Translation:**
- When the Ubuntu VM (192.168.10.4) accesses the internet
- It goes through the NAT gateway (192.168.10.2)
- Gets translated to the host's IP (192.168.1.154)
- Then goes through your router (192.168.1.1) to the internet
The internet sees all VM traffic as coming from **192.168.1.154** (your host PC).
---
## **What is Port Forwarding?**
Now we have a problem. The VM has internet access, which is great. But what if you're running a **service inside the VM** (like a web server, SSH, database, or Docker container) that you want to access from your host machine or network?
**The Problem:**
Your Ubuntu VM is running a Docker container on port 8004. But the VM has a private IP (192.168.10.4) that's only accessible within the NAT network. You **cannot** access it directly from your host machine using `http://192.168.10.4:8004` in your browser.
 **Why?**
- The VM's private IP (192.168.10.4) is **isolated** by NAT
- Your host machine's browser doesn't know how to route to that private network
- NAT provides **one-way connectivity** by default (VM → Internet ✅, Internet → VM ❌)
**The Solution: Port Forwarding**
Port forwarding creates a **mapping** that allows external access to services running inside NAT-protected VMs.
**Simple Explanation:**
Port forwarding tells the NAT device:
> "When someone connects to **port 8004 on the host** (localhost:8004), forward that connection to **port 8004 on the VM** (192.168.10.4:8004)"
It's like setting up a **direct tunnel** from your host machine to a specific service inside the VM.
---
## **Why is Port Forwarding Used?**
Port forwarding is essential in NAT environments for several reasons:
### **1. Access VM Services from Host**
Run web servers, databases, or applications in VMs and access them from your host machine's browser or tools.
**Example:**
- Web server running in VM on port 80
- Port forward: localhost:8080 → VM:80
- Access via: `http://localhost:8080`
### **2. Remote Access**
Connect to VMs using SSH, RDP, or other remote protocols.
**Example:**
- SSH server running in VM on port 22
- Port forward: localhost:2222 → VM:22
- SSH via: `ssh -p 2222 user@localhost`
### **3. Development and Testing**
Test applications, APIs, or services running in isolated VM environments.
**Example:**
- REST API in VM on port 3000
- Port forward: localhost:3000 → VM:3000
- Test via: `curl http://localhost:3000/api/users`
### **4. Multi-VM Scenarios**
Access multiple VMs running the same service on the same port.
**Example:**
- VM1 running web server on port 80
- VM2 running web server on port 80
- Port forward: localhost:8080 → VM1:80
- Port forward: localhost:8081 → VM2:80
### **5. Access from Other Devices**
Share VM services with other computers on your network.
**Example:**
- VM running web app on port 5000
- Port forward: host:5000 → VM:5000
- Access from another PC: `http://192.168.1.154:5000`
---
## **Configuring Port Forwarding in VMware Workstation**
Let's configure port forwarding to access the Docker container running inside our Ubuntu VM.
### **Our Scenario:**
- **Ubuntu Server VM IP:** 192.168.10.4
- **Docker container** running inside Ubuntu on **port 8004**
- **Goal:** Access the Docker container from host browser at `http://localhost:8004`
### **Step 1: Open Virtual Network Editor**
1. Open VMware Workstation
2. Go to **Edit** → **Virtual Network Editor**
3. Click **"Change Settings"** (requires admin privileges)
### **Step 2: Select NAT Network**
1. Click on **VMnet8** (your NAT network)
2. Click the **"NAT Settings..."** button
**Why?**
- The VM's private IP (192.168.10.4) is **isolated** by NAT
- Your host machine's browser doesn't know how to route to that private network
- NAT provides **one-way connectivity** by default (VM → Internet ✅, Internet → VM ❌)
**The Solution: Port Forwarding**
Port forwarding creates a **mapping** that allows external access to services running inside NAT-protected VMs.
**Simple Explanation:**
Port forwarding tells the NAT device:
> "When someone connects to **port 8004 on the host** (localhost:8004), forward that connection to **port 8004 on the VM** (192.168.10.4:8004)"
It's like setting up a **direct tunnel** from your host machine to a specific service inside the VM.
---
## **Why is Port Forwarding Used?**
Port forwarding is essential in NAT environments for several reasons:
### **1. Access VM Services from Host**
Run web servers, databases, or applications in VMs and access them from your host machine's browser or tools.
**Example:**
- Web server running in VM on port 80
- Port forward: localhost:8080 → VM:80
- Access via: `http://localhost:8080`
### **2. Remote Access**
Connect to VMs using SSH, RDP, or other remote protocols.
**Example:**
- SSH server running in VM on port 22
- Port forward: localhost:2222 → VM:22
- SSH via: `ssh -p 2222 user@localhost`
### **3. Development and Testing**
Test applications, APIs, or services running in isolated VM environments.
**Example:**
- REST API in VM on port 3000
- Port forward: localhost:3000 → VM:3000
- Test via: `curl http://localhost:3000/api/users`
### **4. Multi-VM Scenarios**
Access multiple VMs running the same service on the same port.
**Example:**
- VM1 running web server on port 80
- VM2 running web server on port 80
- Port forward: localhost:8080 → VM1:80
- Port forward: localhost:8081 → VM2:80
### **5. Access from Other Devices**
Share VM services with other computers on your network.
**Example:**
- VM running web app on port 5000
- Port forward: host:5000 → VM:5000
- Access from another PC: `http://192.168.1.154:5000`
---
## **Configuring Port Forwarding in VMware Workstation**
Let's configure port forwarding to access the Docker container running inside our Ubuntu VM.
### **Our Scenario:**
- **Ubuntu Server VM IP:** 192.168.10.4
- **Docker container** running inside Ubuntu on **port 8004**
- **Goal:** Access the Docker container from host browser at `http://localhost:8004`
### **Step 1: Open Virtual Network Editor**
1. Open VMware Workstation
2. Go to **Edit** → **Virtual Network Editor**
3. Click **"Change Settings"** (requires admin privileges)
### **Step 2: Select NAT Network**
1. Click on **VMnet8** (your NAT network)
2. Click the **"NAT Settings..."** button
 ### **Step 3: Open Port Forwarding Configuration**
The NAT Settings window opens, showing:
- Gateway IP address
- Port forwarding section with Add/Edit/Remove buttons
### **Step 3: Open Port Forwarding Configuration**
The NAT Settings window opens, showing:
- Gateway IP address
- Port forwarding section with Add/Edit/Remove buttons
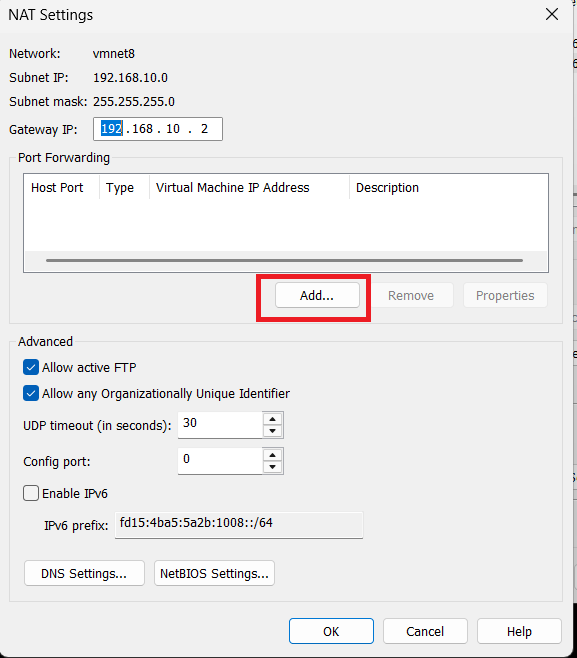 ### **Step 4: Add Port Forwarding Rule**
1. Click the **"Add..."** button in the Port Forwarding section
2. The **"Map Incoming Port"** dialog appears
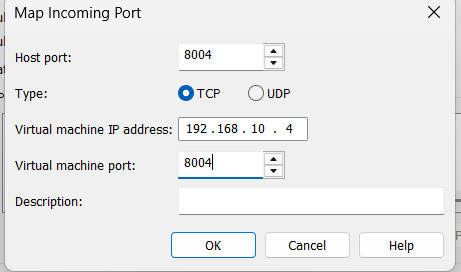
### **Step 5: Fill in Port Forwarding Details**
In the Map Incoming Port dialog, fill in these fields:
**Host Port:**
- Enter: `8004`
- This is the port on your **host machine** where you'll access the service
- You'll use `localhost:8004` in your browser
**Type:**
- Select: **TCP**
- Most services (HTTP, SSH, databases) use TCP
- Use UDP only for specific services that require it
**Virtual Machine IP Address:**
- Enter: `192.168.10.4`
- This is your Ubuntu Server's IP address
- Get this by running `ip addr` inside the VM
**Virtual Machine Port:**
- Enter: `8004`
- This is the port where the Docker container is running inside the VM
**Description (Optional):**
- Enter: `Docker Container on Ubuntu`
- Helps you remember what this rule is for
### **Step 4: Add Port Forwarding Rule**
1. Click the **"Add..."** button in the Port Forwarding section
2. The **"Map Incoming Port"** dialog appears
### **Step 5: Fill in Port Forwarding Details**
In the Map Incoming Port dialog, fill in these fields:
**Host Port:**
- Enter: `8004`
- This is the port on your **host machine** where you'll access the service
- You'll use `localhost:8004` in your browser
**Type:**
- Select: **TCP**
- Most services (HTTP, SSH, databases) use TCP
- Use UDP only for specific services that require it
**Virtual Machine IP Address:**
- Enter: `192.168.10.4`
- This is your Ubuntu Server's IP address
- Get this by running `ip addr` inside the VM
**Virtual Machine Port:**
- Enter: `8004`
- This is the port where the Docker container is running inside the VM
**Description (Optional):**
- Enter: `Docker Container on Ubuntu`
- Helps you remember what this rule is for
 ### **Step 6: Save the Port Forwarding Rule**
1. Click **"OK"** in the Map Incoming Port dialog
2. You'll see your new rule appear in the port forwarding list
3. Click **"OK"** in the NAT Settings window
4. Click **"OK"** or **"Apply"** in the Virtual Network Editor
**Important:** Changes take effect immediately - no need to restart any services!
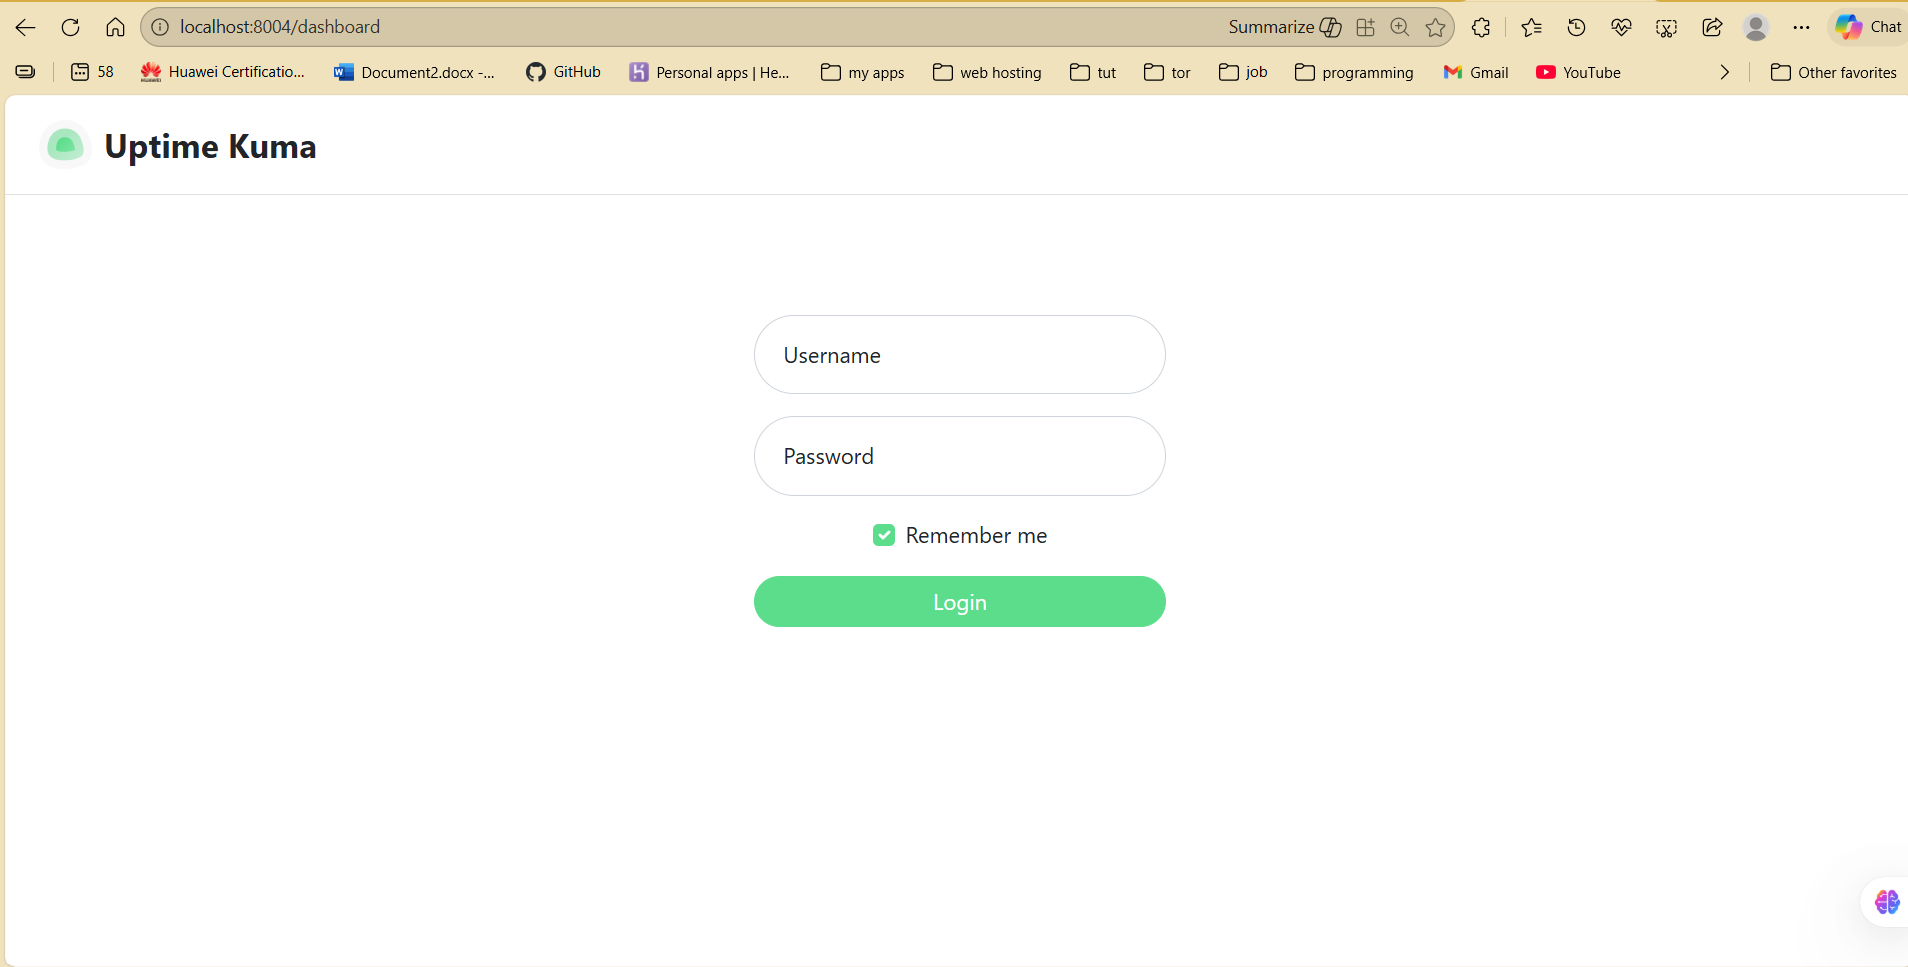
### **Step 7: Test the Port Forwarding**
Now let's verify that port forwarding works:
1. Open your **web browser** on the host machine
2. Navigate to: `http://localhost:8004`
3. You should see your Docker container's web interface!
### **Step 6: Save the Port Forwarding Rule**
1. Click **"OK"** in the Map Incoming Port dialog
2. You'll see your new rule appear in the port forwarding list
3. Click **"OK"** in the NAT Settings window
4. Click **"OK"** or **"Apply"** in the Virtual Network Editor
**Important:** Changes take effect immediately - no need to restart any services!
### **Step 7: Test the Port Forwarding**
Now let's verify that port forwarding works:
1. Open your **web browser** on the host machine
2. Navigate to: `http://localhost:8004`
3. You should see your Docker container's web interface!
 **Alternative access methods:**
From the same host PC:
```
http://localhost:8004
http://127.0.0.1:8004
```
From another computer on your LAN:
```
http://192.168.1.154:8004
(where 192.168.1.154 is your host PC's LAN IP)
**Alternative access methods:**
From the same host PC:
```
http://localhost:8004
http://127.0.0.1:8004
```
From another computer on your LAN:
```
http://192.168.1.154:8004
(where 192.168.1.154 is your host PC's LAN IP)
Understanding the Complete Traffic Flow
Let's trace what happens when you access http://localhost:8004:
- Browser Request: You type
http://localhost:8004in your browser - Host Machine: Request hits port 8004 on your Windows PC (192.168.1.154)
- Port Forwarding Rule: VMware NAT device intercepts the request
- NAT Translation: Forwards the request to 192.168.10.4:8004
- Ubuntu VM: Receives the request on port 8004
- Docker Container: Processes the request and sends response
- Reverse Path: Response goes back through NAT to your browser
- Browser Display: You see the Docker container's web page!
Common Port Forwarding Examples
Here are practical port forwarding configurations for different services:
SSH Access to Ubuntu VM
Scenario: Access VM via SSH from host
Configuration:
- Host Port: 2222
- Type: TCP
- VM IP: 192.168.10.4
- VM Port: 22
- Description: SSH to Ubuntu Server
Usage:
bash
ssh -p 2222 username@localhost
Multiple VMs with SSH
Scenario: SSH access to multiple VMs
Configuration:
- VM1: localhost:2222 → 192.168.10.4:22
- VM2: localhost:2223 → 192.168.10.5:22
- VM3: localhost:2224 → 192.168.10.6:22
Usage:
bash
ssh -p 2222 user@localhost  # VM1
ssh -p 2223 user@localhost  # VM2
ssh -p 2224 user@localhost  # VM3
```

### **Web Server (Apache/Nginx)**

**Configuration:**
- **Host Port:** 8080
- **Type:** TCP
- **VM IP:** 192.168.10.4
- **VM Port:** 80

**Usage:**
```
http://localhost:8080
```

### **HTTPS Web Server**

**Configuration:**
- **Host Port:** 8443
- **Type:** TCP
- **VM IP:** 192.168.10.4
- **VM Port:** 443

**Usage:**
```
https://localhost:8443
MySQL Database
Configuration:
- Host Port: 3307
- Type: TCP
- VM IP: 192.168.10.4
- VM Port: 3306
Usage:
bash
mysql -h 127.0.0.1 -P 3307 -u root -p
```

### **SD-WAN vManage**

**Configuration:**
- **Host Port:** 9443
- **Type:** TCP
- **VM IP:** 192.168.10.10
- **VM Port:** 443

**Usage:**
```
https://localhost:9443
Best Practices and Important Tips
1. Use Static IP for VMs
Problem:
- VMware DHCP assigns IPs dynamically
- VM might get a different IP after restart
- Port forwarding rules will break
Solution: Configure a static IP inside your VM:
For Ubuntu (using Netplan):
Edit /etc/netplan/01-netcfg.yaml:
yaml
network:
  version: 2
  ethernets:
    ens33:
      dhcp4: no
      addresses:
        - 192.168.10.4/24
      routes:
        - to: default
          via: 192.168.10.2
      nameservers:
        addresses:
          - 192.168.10.2
          - 8.8.8.8
Apply changes:
bash
sudo netplan apply
```

### **2. Use Unique Host Ports**

Each port forwarding rule must use a **different host port**.

**Wrong:**
```
Rule 1: localhost:8080 → VM1:80
Rule 2: localhost:8080 → VM2:80  ❌ Conflict!
```

**Correct:**
```
Rule 1: localhost:8080 → VM1:80  ✅
Rule 2: localhost:8081 → VM2:80  ✅
3. Check VM Firewall
Even with port forwarding configured, the VM's firewall might block connections.
Ubuntu/Debian:
bash
# Check firewall status
sudo ufw status

# Allow specific port
sudo ufw allow 8004/tcp

# Reload firewall
sudo ufw reload
CentOS/RHEL:
bash
# Check firewall
sudo firewall-cmd --list-all

# Allow port
sudo firewall-cmd --add-port=8004/tcp --permanent
sudo firewall-cmd --reload
4. Verify Service is Running
Before testing port forwarding, ensure the service is actually running in the VM.
Check if Docker container is running:
bash
docker ps
Check if port is listening:
bash
sudo netstat -tulpn | grep :8004
# Or
sudo ss -tulpn | grep :8004
5. Document Your Port Forwarding Rules
Keep a record of your port forwarding rules:
| Service | Host Port | VM IP | VM Port | Description |
|---|---|---|---|---|
| Docker App | 8004 | 192.168.10.4 | 8004 | Main web app |
| SSH Ubuntu | 2222 | 192.168.10.4 | 22 | SSH access |
| MySQL | 3307 | 192.168.10.5 | 3306 | Database server |
6. Security Considerations
⚠️ Important Security Notes:
- Port forwarding exposes services to your network
- If your host PC is directly connected to the internet, forwarded ports may be publicly accessible
- Always use strong authentication for exposed services
- Consider using non-standard ports (e.g., 2222 instead of 22 for SSH)
- Keep VM software and services updated
- Use SSL/TLS for web services when possible
Troubleshooting Common Issues
Problem: Cannot connect to localhost:8004
Check 1: Is the VM running?
- Verify the VM is powered on in VMware
Check 2: Is the service running inside the VM?
bash
# Inside VM
sudo netstat -tulpn | grep :8004
docker ps  # if it's a Docker container
Check 3: Is the VM IP correct?
bash
# Inside VM
ip addr show
# Verify it matches your port forwarding rule
Check 4: Is the VM's firewall blocking the port?
bash
sudo ufw status
sudo ufw allow 8004/tcp
Check 5: Is the port forwarding rule correct?
- Open Virtual Network Editor → NAT Settings
- Verify the rule exists and has correct values
Check 6: Try accessing from the VM itself
bash
# Inside the VM
curl http://localhost:8004
# or
curl http://192.168.10.4:8004
If this works but localhost:8004 from the host doesn't, the issue is with port forwarding.
Problem: Port already in use on host
Error: "Address already in use" or port forwarding doesn't work
Solution: Check if the port is already used on your host machine
Windows:
cmd
netstat -ano | findstr :8004
Linux (if VMware on Linux):
bash
sudo netstat -tulpn | grep :8004

```
```
Choose a different host port if the port is already in use.
### **Problem: Can access from localhost but not from other PCs**
**Solution:** Use your host PC's LAN IP address
Instead of `localhost:8004`, use:
```
http://192.168.1.154:8004
```
Also, check Windows Firewall:
- Allow port 8004 through Windows Firewall
- Or temporarily disable firewall for testing
### **Problem: Port forwarding rules disappear**
**Cause:** VMware updates sometimes reset network settings
**Solution:**
- Back up your `vmnetnat.conf` file (though we're using GUI)
- Document all port forwarding rules
- Recreate them after updates if needed
---
**Frequently Asked Questions (FAQ)
Q1: Can I use the same host port for different VM ports?
No. Each host port must be unique. However, you can forward different host ports to the same VM port on different VMs.
**Example:**
```
localhost:8080 → VM1:80 ✅
localhost:8081 → VM2:80 ✅
Q2: Do I need to restart VMware after adding port forwarding?
No. Port forwarding rules take effect immediately. You don't need to restart VMware Workstation or any services.
Q3: Can I change the NAT subnet from the default?
Yes! In the Virtual Network Editor, you can change VMnet8's subnet to any private IP range you prefer (10.x.x.x, 172.16-31.x.x, 192.168.x.x).
Q4: Will port forwarding work if I'm using VPN on my host?
Yes. Port forwarding works regardless of your host's network connection (Ethernet, WiFi, VPN, tethering). The forwarding happens at the VMware NAT level before traffic reaches your physical network.
Q5: Can I forward ports to multiple VMs?
Yes! You can create as many port forwarding rules as needed. Just use different host ports for each VM/service.
Q6: Is NAT mode faster than Bridged mode?
Performance is generally similar. NAT adds minimal overhead for the address translation. For most use cases, you won't notice any performance difference.
Q7: Can other computers on my network access the forwarded ports?
Yes! Instead of using localhost, they can use your host PC's LAN IP address. For example: http://192.168.1.154:8004
Q8: What happens if my VM's IP changes?
Your port forwarding rule will break. This is why it's recommended to set a static IP inside your VM instead of relying on DHCP.
Conclusion
NAT networking in VMware Workstation provides the perfect balance of isolation, connectivity, and flexibility for virtual machine environments. By understanding how NAT works and how to properly configure port forwarding, you can:
- ✅ Give VMs internet access without exposing them to your LAN
- ✅ Access VM services from your host machine
- ✅ Run complex lab environments safely
- ✅ Test applications in isolated environments
- ✅ Share VM services with other computers when needed